
Overview
BADASS — BGP At Doors of Autonomous Systems is Simple — is a three-part 42 project. I went from basic container networking to running the same BGP EVPN control plane that data centers at Amazon, Google, and Microsoft use in production, building it all in GNS3: a Docker-based lab first, then VXLAN tunnels between hosts, then a full EVPN fabric that finds those tunnels on its own over BGP.
Nothing here is dumbed down for the sake of the lab. The FRRouting configs, the route types, even the commands I used to chase down a broken session are the same stuff you'd find on a Cisco or Juniper box in production. That's really the point of the project: you come away actually understanding how a data center fabric behaves, instead of just being able to follow a script.
Each part leans on the one before it, so the difficulty ramps up slowly instead of all at once:
- Part 1 — a Docker-based lab environment in GNS3
- Part 2 — VXLAN tunnels and packet encapsulation
- Part 3 — a BGP EVPN control plane that automates the tunnels
Part 1 — GNS3 Configuration with Docker
Part 1 is just getting a test environment working. Every networking project needs one, and here that means GNS3 plus Docker.
GNS3 is the simulator, the canvas where you actually lay out a topology. Docker supplies the containers that stand in for network devices, without the overhead of spinning up a full VM for every node. Containers share the host's kernel instead of running their own OS, so a fairly involved topology still runs fine on modest hardware, and because the images are versioned, the lab looks the same on my machine as it would on anyone else's.
You'll build two Docker images in this part:
- A host image — a lightweight box for generating and receiving test traffic.
- A router image — a full virtual router running several routing daemons.
It's the same split you'd see in a real network: edge devices doing one job, core routing infrastructure doing another.
Setting Up the Lab Environment
Start by installing GNS3 and Docker in your VM. GNS3 handles the topology and simulation; Docker handles the containers. Together they let you drag containers into a topology and wire them up like physical hardware.
Getting this part right matters more than it looks like it should. You need Docker's networking mode configured correctly, IP forwarding enabled on the host, and firewall rules loosened enough that containers can actually reach each other. It's tedious, but it's also just Linux networking fundamentals, and those come back again and again later in the project.
Building the Host Container Image
The host image should be small but functional. Alpine Linux is a good base for it — about as minimal as a distro gets, and the standard choice for containerized workloads.
Example Dockerfile:
FROM alpine:latest

# Install essential networking tools
RUN apk add --no-cache \
    busybox-extras \
    iproute2 \
    iputils \
    net-tools \
    bind-tools \
    tcpdump

# Keep container running
CMD ["/bin/sh"]
Make sure the image includes these tools:
- ping — test reachability between hosts
- ip — configure interfaces and routing tables
- ifconfig — check interface status
- traceroute — trace the path and measure latency
- tcpdump — capture packets for deep analysis
You end up reaching for these constantly. Later on, these same containers become the test endpoints for VXLAN and BGP EVPN traffic, and keeping them dumb on purpose pays off — when something breaks, you already know it's not the host's fault.
Building the Router Container Image
The router image is the core of the lab. It needs a more complete distro and several routing daemons.
Use FRRouting, the modern successor to Quagga. FRR's zebra daemon manages the kernel routing table and coordinates between protocols.
Example Dockerfile:
FROM alpine:latest

# Install FRRouting (successor to Quagga)
RUN apk add --no-cache \
    frr \
    frr-pythontools \
    iproute2 \
    busybox-extras

# Enable IP forwarding
RUN echo "net.ipv4.ip_forward = 1" >> /etc/sysctl.conf && \
    echo "net.ipv6.conf.all.forwarding = 1" >> /etc/sysctl.conf

# Copy FRR daemon configuration
COPY daemons /etc/frr/daemons

# Expose BGP port
EXPOSE 179

CMD ["/usr/lib/frr/frrinit.sh", "start"]
Include these daemons:
- zebra — talks to the kernel routing table
- bgpd — handles BGP, including EVPN
- ospfd — OSPF, a link-state routing protocol
- isisd — IS-IS, another link-state protocol
This project is really about BGP, but it's handy to have OSPF and IS-IS around too if you want to compare how they behave. Each daemon runs on its own and just talks to zebra to install or pull routes. The config syntax itself looks a lot like what you'd type on real Cisco or Juniper gear, and that's not an accident — the whole idea is for these skills to carry over.
Verifying Connectivity
Once the images are built and imported into GNS3, wire up something simple and test it before going any further. Everything after this depends on it working.
# On Host1 (10.1.1.2/24)
ip addr add 10.1.1.2/24 dev eth0
ip link set eth0 up
ip route add default via 10.1.1.1

# On Router (10.1.1.1/24 and 10.2.2.1/24)
ip addr add 10.1.1.1/24 dev eth0
ip addr add 10.2.2.1/24 dev eth1
ip link set eth0 up
ip link set eth1 up

# On Host2 (10.2.2.2/24)
ip addr add 10.2.2.2/24 dev eth0
ip link set eth0 up
ip route add default via 10.2.2.1

# Test connectivity from Host1 to Host2
ping 10.2.2.2
A simple test topology: two hosts, each on a different subnet, connected through one router. It also gets you comfortable with GNS3's console access and basic interface configuration, which you'll lean on repeatedly as the project grows.
Tip
If your router and host templates in GNS3 don't run with the NET_ADMIN capability (or --privileged), sort that out now. Creating VXLAN interfaces in Part 2 fails silently otherwise, and it's an easy thing to burn an hour on.
Part 2 — Discovering VXLAN
Part 2 is about VXLAN, which stretches Layer 2 networks across Layer 3 infrastructure. To see why that's useful, it helps to start with what it's replacing: the plain old VLAN.
Understanding Traditional VLANs
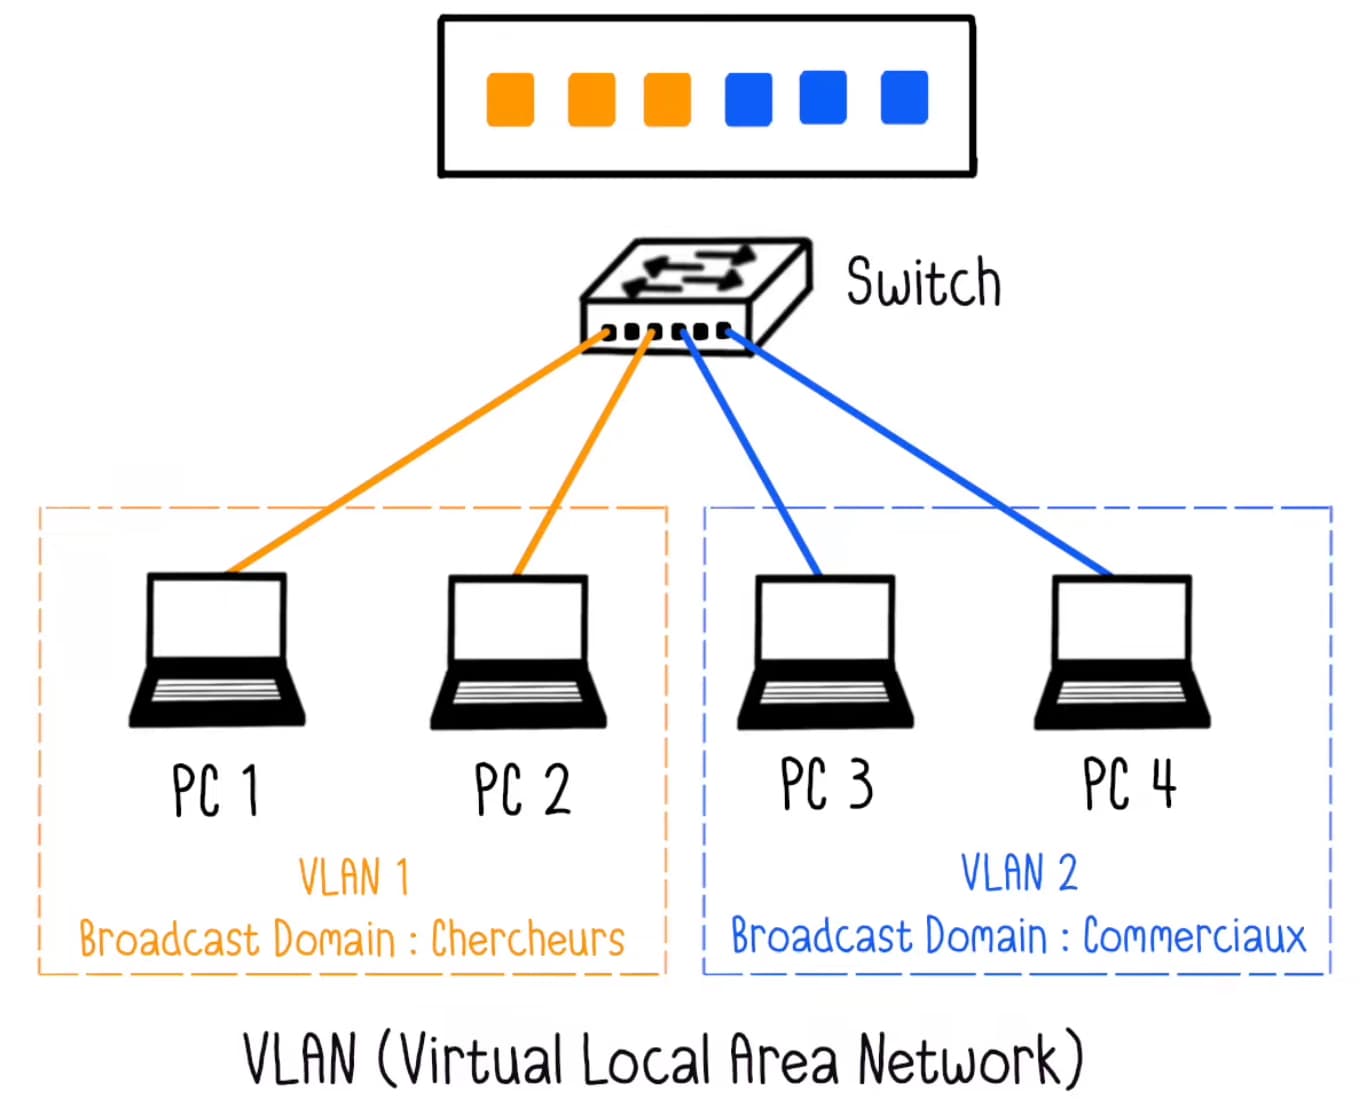
A VLAN splits one physical network into several logical ones, with no extra switches or cabling required. VLANs work at Layer 2, tagging Ethernet frames with a 12-bit identifier defined by the 802.1Q standard [@ieee8021q]. Think of them as virtual rooms: devices in the same VLAN talk directly at Layer 2, devices in different VLANs can't, even on the same switch. Any traffic between VLANs has to pass through a router, which can apply security rules along the way.
802.1Q adds a 4-byte tag to the Ethernet header, and its 12-bit ID field allows for 4096 VLANs, with a handful reserved, so about 4094 are usable in practice. That was plenty for a typical enterprise network. Cloud computing is what broke it.
The Limitations of Traditional VLANs
Cloud-scale data centers exposed real cracks in the VLAN model:
- Limited scale — only 4096 available VLAN IDs
- Geographic constraints — can't span data centers without heavy engineering
- Spanning Tree overhead — blocks redundant links, wasting bandwidth
- Manual provisioning — needs configuration on every switch in the path
- Multi-tenancy limits — not enough isolation for cloud-scale environments
The tightest squeeze is usually IDs — give every tenant in a multi-tenant cloud its own network and 4094 disappears fast. Spanning Tree makes the redundancy problem worse, too: it blocks links instead of using them, so a chunk of capacity just sits idle. None of that fits how a modern, API-driven data center wants to run, and that mismatch is basically why VXLAN exists.
| VLAN (802.1Q) | VXLAN | |
|---|---|---|
| ID space | 12-bit → ~4,094 usable | 24-bit → ~16.7 million |
| Boundary | Single Layer 2 domain | Any routed IP network |
| Spans data centers | Needs extra engineering | Native |
| Provisioning | Per-switch, by hand | API-driven |
VXLAN Architecture and Design
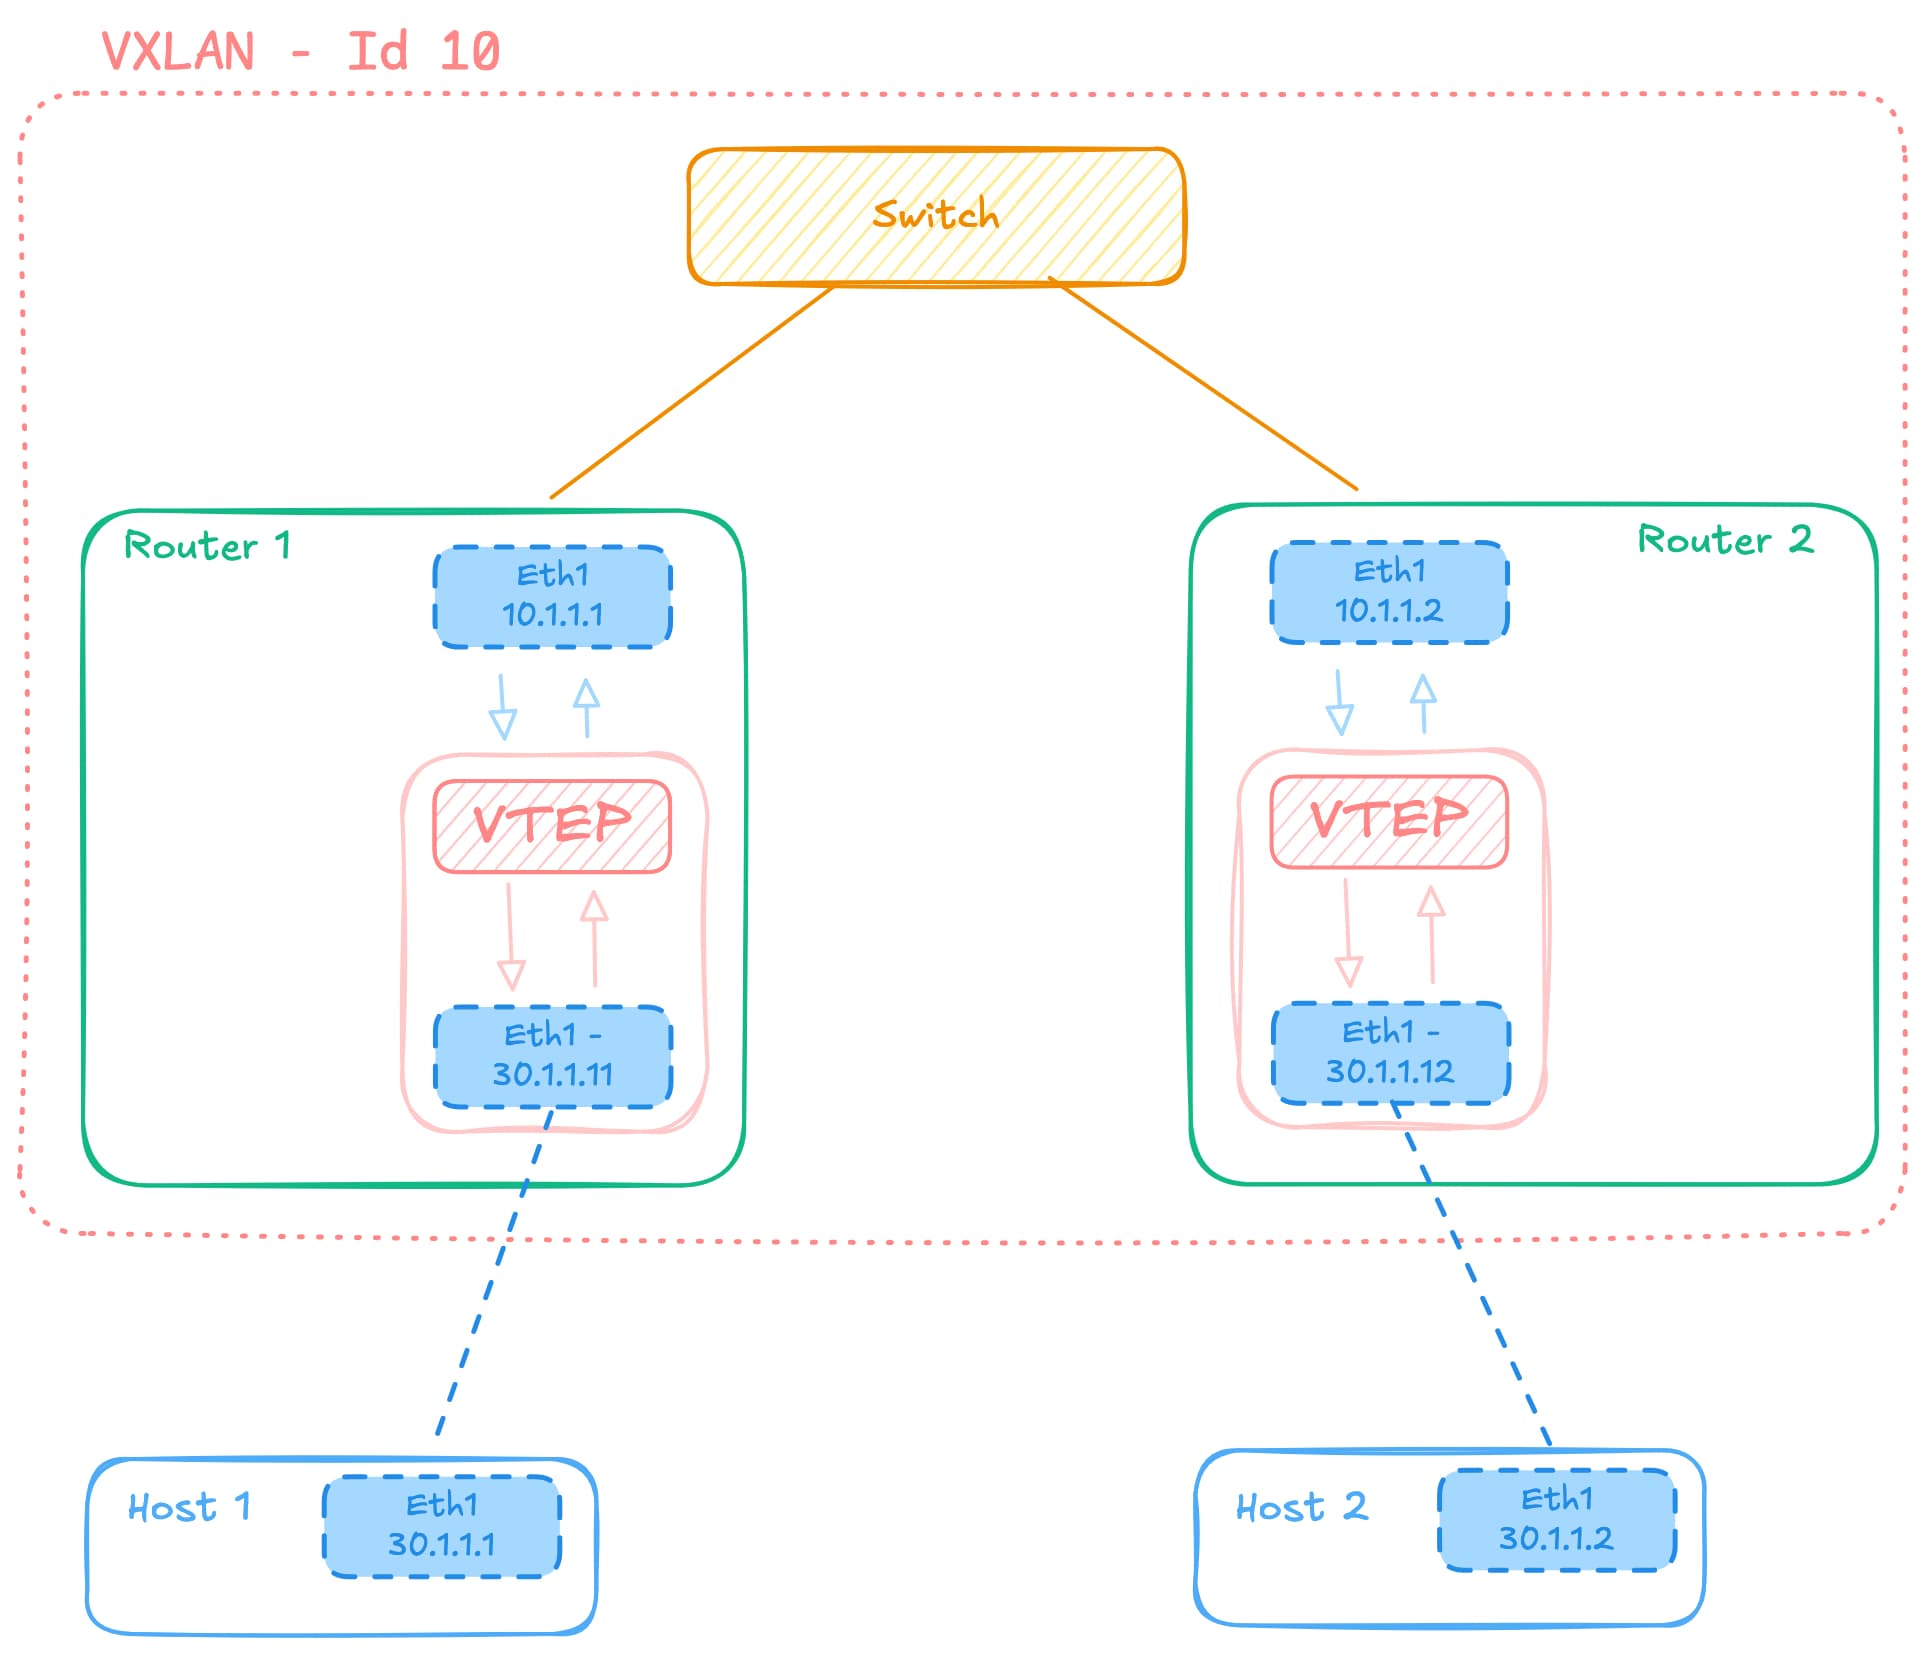
VXLAN takes a different approach [@rfc7348]. Instead of tagging frames, it wraps the entire Ethernet frame inside a Layer 3 UDP packet, sometimes called "MAC-in-UDP." That lets Layer 2 segments stretch across any IP network, including routed networks that span data centers or regions.
A VXLAN packet includes:
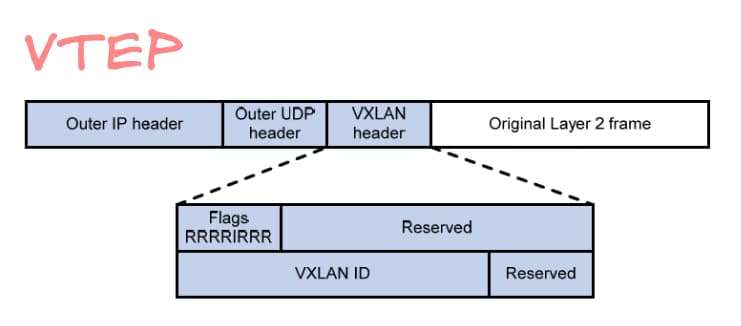
- VXLAN Header — 8 bytes of flags and the VNI
- VNI (VXLAN Network Identifier) — 24 bits, supporting 16 million networks
- Outer UDP Header — uses destination port 4789
- Outer IP Header — routes the packet through the underlay
- Outer Ethernet Header — frames it for the wire
- Original Ethernet Frame — the actual payload being tunneled
24 bits gets you 16 million possible segments, roughly 4,000x what 802.1Q allows, and nobody's anywhere close to running out.
Example VXLAN interface setup:
# Create VXLAN interface on Linux
ip link add vxlan10 type vxlan \
    id 10 \
    dstport 4789 \
    local 10.0.0.1 \
    remote 10.0.0.2

# Bring up the interface
ip link set vxlan10 up

# Add to bridge
ip link add br0 type bridge
ip link set vxlan10 master br0
ip link set eth1 master br0
VXLAN uses UDP, not TCP, which avoids the overhead of connection setup and state tracking. The underlying IP network already handles routing, and if a packet gets dropped, TCP running inside the tunnel handles retransmission. VXLAN itself doesn't need to bother.
VTEP: The VXLAN Tunnel Endpoint
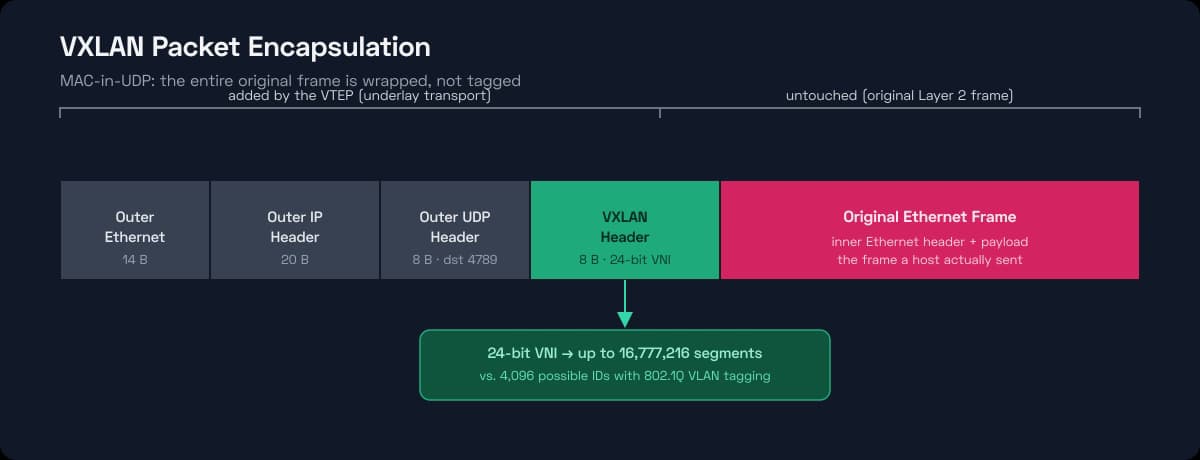
A VXLAN Tunnel Endpoint (VTEP) sits at the edge of each segment and handles encapsulation and decapsulation. It can live in a physical switch, a virtual switch on a hypervisor, or, as in this lab, a container's network stack.
Sending traffic to a remote segment works roughly like this:
- The VTEP looks up which remote VTEP serves the destination MAC address.
- It builds a VXLAN header with the right VNI.
- It wraps the original frame in a UDP packet addressed to the remote VTEP.
- It sends the packet into the underlay network.
The reverse happens on receipt: the VTEP strips the VXLAN header, reads the destination MAC, and forwards the original frame locally. Hosts never see any of this — to them it just looks like an ordinary Layer 2 network, no matter what the physical topology underneath actually looks like.
The Performance Benefits of VXLAN
Traditional Layer 2 networks suffer from broadcast storms, where broadcast traffic hits every device on the network. VXLAN limits this by scoping broadcast traffic to only the VTEPs that have members in a given VNI, through one of two mechanisms:
- Ingress replication — the source VTEP sends a separate unicast copy to every other VTEP in the VNI. No multicast support needed from the underlay, and it's what most modern EVPN deployments actually use, at the cost of extra bandwidth at the source once a VNI has a lot of members.
- Multicast in the underlay — a single copy fans out at the routers instead, avoiding that per-VTEP replication cost, but only if multicast is supported end to end.
VXLAN also opens the door to real multipath networking. Since VXLAN packets are just IP packets, they load-balance across multiple links using standard ECMP. The UDP source port is derived from the inner frame's headers, so packets in the same flow always take the same path (no reordering), while different flows spread across multiple paths.
One more benefit, less obvious than the others: overlay and underlay are fully decoupled. You get to optimize the underlay purely for throughput and latency, without worrying about what the overlay networks running on top of it actually need.
Isolation and Cost
Two things beyond the raw scale numbers explain why VXLAN became the default for multi-tenant data centers.
Isolation is one of them. Every VNI is sealed off from every other VNI at the VTEP, and nothing crosses between them unless you explicitly configure a path for it to. That's what lets unrelated tenants share the same physical switches safely — a compromised host in one VNI simply has nowhere to go.
Anything that does need to cross VNIs has to pass through a Layer 3 device, which is exactly where you'd want firewall rules or intrusion detection sitting anyway, and it's where security teams can apply different policies per VNI.
Cost is the other. Standing up a separate physical network per tenant doesn't scale, not in hardware and not in the hours it takes to run it. VXLAN lets a lot of virtual networks share the same physical gear instead.
Because segments get defined through an API rather than touched switch-by-switch by hand, provisioning ends up both faster and less error-prone. That same decoupling is also what lets a workload move between data centers without anyone having to touch the network.
Part 3 — Discovering BGP with EVPN
Part 3 is BGP EVPN, the piece that automates all of this at scale. Hand-wiring VXLAN tunnels between VTEPs is fine for a handful of devices, but it stops being fine somewhere around dozens or hundreds. EVPN fixes that by letting VTEPs find each other and build tunnels on their own.
Understanding BGP Fundamentals
BGP has run the internet for decades [@rfc4271]. It exchanges routing information between the autonomous systems that make up the global network. It's a path vector protocol, meaning it tracks the entire chain of autonomous systems traffic has to cross to reach a destination, and that visibility is what lets it apply policy based on business relationships, performance, or whatever else an operator cares about.
BGP's real strength is extensibility. It started out carrying only IPv4 routes. Multi-Protocol BGP extensions [@rfc4760] later added support for IPv6, multicast, VPNs, and — relevant here — EVPN routes, which carry Layer 2 and Layer 3 reachability for overlay networks.
BGP runs over a TCP session between routers and only sends updates when something actually changes, instead of re-announcing the whole table every time. At scale, that efficiency is a big part of why it makes sense as the foundation for an overlay control plane.
EVPN: Extending BGP for Ethernet VPNs
EVPN extends BGP [@rfc7432] to carry MAC address reachability alongside IP routes, which makes BGP the control plane for VXLAN overlays: it tells every VTEP which MAC addresses live behind which other VTEPs.
The real shift is how MAC addresses get learned in the first place. Traditional Layer 2 does it through flooding, at the data plane. EVPN does it through BGP signaling instead: a VTEP that sees a new local MAC just advertises it to every other VTEP, and remote VTEPs install that forwarding state straight from the route, no flooding involved. Broadcast, unknown-unicast, and multicast traffic all drop off dramatically as a result.
EVPN also reuses route distinguishers and route targets from BGP/MPLS VPN technology. Every VNI gets a route target, and a VTEP only imports routes matching its own configured targets, so its forwarding table only ever holds state for the VNIs it actually serves. The route distinguisher's job is narrower: it just keeps an identical MAC address in two different VNIs from colliding inside the same BGP table.
EVPN Route Types and Their Functions
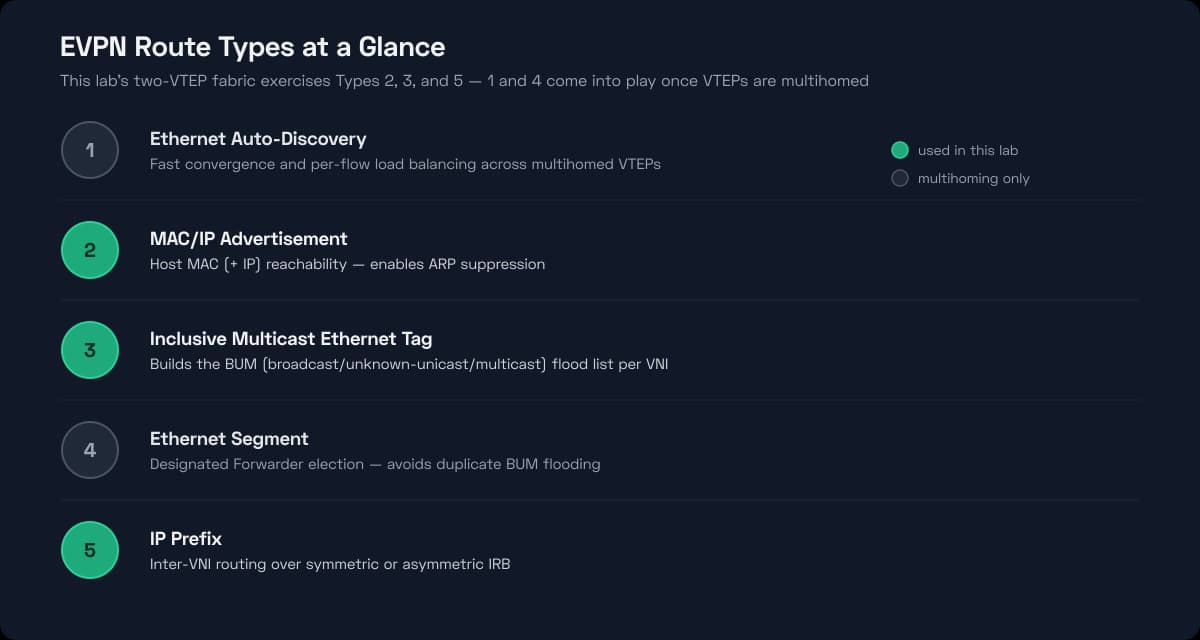
EVPN defines a handful of route types, and each one does exactly one job. This lab's two-VTEP topology only touches Types 2, 3, and 5 directly — Types 1 and 4 belong to multihoming, which isn't part of this setup, but production fabrics lean on them constantly, so they're worth knowing about anyway.
Type 1 Routes — Ethernet Auto-Discovery
These only start mattering once a device is multihomed to more than one VTEP, a common redundancy pattern in production fabrics. They do two things: on failure, a VTEP can withdraw a single Type 1 route instead of every MAC address it had been advertising individually, which converges much faster. And while things are healthy, remote VTEPs use them to load-balance traffic across all the VTEPs serving that segment.
Type 2 Routes — MAC/IP Advertisement
Type 2 is the workhorse route. It carries a host's MAC address and, optionally, its IP address alongside it.
A Type 2 route advertises a MAC learned locally, optionally the matching IP for ARP suppression, the VNI it belongs to, and a MAC mobility extended community that handles VM migration. When a host ARPs for another host's MAC, the local VTEP can just answer out of its own EVPN-learned table instead of flooding the request across the fabric.
Type 3 Routes — Inclusive Multicast Ethernet Tag
Type 3 handles BUM traffic — broadcast, unknown unicast, and multicast. Every VTEP advertises one Type 3 route per VNI it belongs to, essentially announcing "send me this VNI's flood traffic." That's also what builds the flood list, and it supports both ingress replication and multicast-based flooding. It matters early on too: before any Type 2 routes exist yet, Type 3 is how a VTEP gets discovered in the first place.
Type 4 Routes — Ethernet Segment
Type 4 routes are how multihomed VTEPs elect a Designated Forwarder for a segment, the one VTEP actually responsible for forwarding that segment's BUM traffic. Skip this step and every multihomed VTEP floods the same broadcast frame, and downstream hosts start seeing duplicates.
Type 5 Routes — IP Prefix Routes
Type 5 is what lets you route between VNIs directly at the VTEP, rather than just reach individual hosts the way Type 2 does. It carries whole subnets instead of single addresses, does the actual Layer 3 routing between VNIs, and supports either symmetric or asymmetric IRB (Integrated Routing and Bridging) depending on whether you want a centralized or distributed gateway.
The symmetric/asymmetric split comes down to where the routing lookup actually happens:
- Symmetric IRB — routes twice: once at the ingress VTEP into a shared transit VNI, then again at the egress VTEP into the destination VNI. No single VTEP needs to know about every VNI in the fabric, only the ones it directly serves.
- Asymmetric IRB — skips that transit hop and does both lookups on ingress instead. Simpler to configure, but every VTEP doing inter-VNI routing has to carry every VNI it might ever route into, which scales worse.
Building the BGP EVPN Control Plane
Start by configuring BGP sessions between every router acting as a VTEP. In large EVPN fabrics, route reflectors cut down on the number of sessions each router needs.
Example FRRouting BGP EVPN configuration:
# Configure BGP with EVPN on Router A (10.0.0.1)
router bgp 65000
  bgp router-id 10.0.0.1
  no bgp default ipv4-unicast
  neighbor 10.0.0.254 remote-as 65000
  neighbor 10.0.0.254 update-source lo

  ! Enable L2VPN EVPN address family
  address-family l2vpn evpn
    neighbor 10.0.0.254 activate
    advertise-all-vni
  exit-address-family
!

# Configure VXLAN interface with VNI 10
interface vxlan10
  vxlan id 10
  vxlan local-tunnelip 10.0.0.1
  bridge-access 10
!

# Associate VNI with BGP EVPN
router bgp 65000
  address-family l2vpn evpn
    vni 10
      rd 10.0.0.1:10
      route-target import 65000:10
      route-target export 65000:10
    exit-vni
  exit-address-family
!
You need two things running side by side: the standard IPv4 unicast address family for underlay reachability, and the EVPN address family for the overlay control plane.
Each VTEP needs its VNIs configured, along with a route distinguisher and route targets. The route distinguisher keeps BGP table entries unique. Route targets control which routes get imported where, and that's the mechanism behind policies like hub-and-spoke VNIs, where spokes can only reach each other through a central hub.
advertise-all-vni is the easy default for a lab: every locally configured VNI gets advertised automatically. Production fabrics often advertise VNIs more selectively instead, to keep control over exactly what each VTEP exposes.
Dynamic VXLAN Tunnel Establishment
BGP EVPN builds VXLAN tunnels on demand. When a VTEP receives an EVPN route for a MAC address in one of its VNIs, it automatically builds the tunnel state needed to reach that VTEP. No manual neighbor configuration, and the network just adapts as VTEPs come and go.
This also saves resources. Rather than maintaining a full mesh of tunnels regardless of traffic, tunnels only form where there's actual demand, which at scale is a meaningful reduction in state each VTEP has to track.
When a host moves, through VM migration or a container getting rescheduled, EVPN just handles it: the old VTEP withdraws its route, the new one advertises a fresh one, and every other VTEP updates its forwarding table on its own. This is the mechanism modern data centers actually lean on for load balancing, maintenance windows, and failure recovery.
Validation and Troubleshooting
Check your EVPN implementation at three layers:
Underlay:
- Confirm IP reachability between all VTEP loopback addresses
- Confirm the underlay routing protocol has converged (OSPF/ISIS/static)
- Test ECMP load distribution
- Measure baseline latency and packet loss
Control plane:
- Confirm BGP sessions are up between VTEPs
- Confirm the EVPN address family is active
- Check route target import/export config
- Validate Type 2, Type 3, and Type 5 route advertisements
Data plane:
- Test host-to-host connectivity across VTEPs
- Confirm VXLAN encapsulation with a packet capture
- Confirm MAC learning happens via the control plane, not flooding
- Validate ARP suppression
Useful commands:
# Check BGP neighbor status
show bgp summary
show bgp l2vpn evpn summary

# View EVPN routes
show bgp l2vpn evpn
show bgp l2vpn evpn route type 2
show bgp l2vpn evpn route type 3

# Check VNI status
show evpn vni
show evpn vni 10
show evpn vni 10 detail

# View MAC address table
show evpn mac vni 10
show evpn mac vni all

# Check VXLAN tunnel endpoints
show interface vxlan10
bridge fdb show

# Capture VXLAN traffic
tcpdump -i eth0 -n udp port 4789 -vv

# Verify underlay reachability
ping 10.0.0.2 -c 4
traceroute 10.0.0.2
Start at the underlay: if VTEP loopbacks can't reach each other, BGP sessions never come up, and nothing above that layer will work.
From there, check the control plane. BGP sessions established, EVPN routes actually flowing. Missing or malformed route advertisements are the most common source of EVPN headaches, so it pays to get comfortable reading BGP's show output.
Warning
The most common reason an EVPN route never shows up on a remote VTEP isn't a broken BGP session, it's a route target mismatch. Double-check that the route-target export on one side actually matches the route-target import on the other. Get that wrong and it fails silently — no error, just a route that never arrives.
Finally, check the data plane. Generate traffic between test hosts and capture packets to confirm the right VNI is used, the right destination VTEP is targeted, and encapsulation/decapsulation both work as expected.
Topology Implementation
A minimal EVPN fabric needs just two router VTEPs, each with a host attached in the same VNI. That's enough to show dynamic MAC learning, automatic tunnel setup, and cross-fabric communication.
Router A and Router B each run BGP with the EVPN address family turned on, and they peer with each other, either directly or through a route reflector. Both carry the same VNI. As hosts talk, each router learns local MAC addresses and advertises them via Type 2 routes.
The VXLAN tunnel forms automatically once both routers exchange EVPN routes. From there, Router A encapsulates traffic from Host 1, and Router B decapsulates it before delivering it to Host 2. The reverse path works the same way. The hosts never know any of this is happening.
Real-World Applications and Scaling Considerations
The design here isn't a simplified stand-in for something else. Major cloud providers run VXLAN with BGP EVPN at genuinely massive scale — the same architecture from this GNS3 lab scales up to data centers with tens of thousands of servers and millions of workloads.
Production deployments add a few more layers on top of what you built here:
- Route reflectors run in redundant pairs, to avoid a single point of failure in the control plane.
- VTEPs are often dual-homed to multiple underlay switches for data-plane redundancy — which is exactly where the Type 1 and Type 4 EVPN routes from earlier come into play.
- Traffic engineering — via ECMP or explicit prioritization — helps make sure critical workloads get the bandwidth they need instead of getting starved by everything else on the fabric.
If you want to see this at actual cloud-provider scale, Vinit Jain's NANOG 68 talk covers the same VxLAN BGP EVPN ideas from this lab, just applied to production fabrics:
Key Takeaways
Three parts that are really one arc: container networking, then an overlay on top of it, then a control plane that automates the overlay. A few things from this project stuck with me more than the rest.
The 24-bit VNI is doing more work than any other single number in this design. Going from 4096 VLANs to 16 million segments isn't just a bigger ceiling — it's the thing that actually makes multi-tenant cloud networking possible at the scale it runs at today. Pretty much everything else about VXLAN exists to support that one number.
EVPN replacing flooding with signaling looked like a small change on paper and mattered a lot more than I expected going in. Learning MAC addresses over BGP instead of through data-plane flooding is the difference between a fabric that tops out at a few dozen switches and one that scales to thousands.
Route targets turned out to be the real access control layer. Import/export policy on route targets is what lets you build hub-and-spoke VNIs, shared-services segments, or hard per-tenant isolation, all without touching the underlay.
The underlay mattering so little was the most counterintuitive part. Once there's IP reachability between VTEP loopbacks, everything above that layer works exactly the same whether the underlay runs OSPF, IS-IS, or static routes. That decoupling is really what makes the whole design portable.
None of that stuck with me the way debugging it did, though. Tracing a broken EVPN route through three layers — underlay reachability, then BGP session state, then a packet capture on the wire — taught me more in an afternoon than the documentation did in a week.
If you want to keep going from here, anycast gateways and Kubernetes' own use of VXLAN for pod networking are the natural next steps, and both build directly on what's in this lab.